
A few hacks to break in sneakers include wearing them in short bursts, and with thick socks. For stronger materials, you can place sealed, water-filled plastic bags inside the sneakers then freeze them, or take a hair dryer to the exterior. You can also use a shoe stretcher or bend the flex points with your hands.
I’m going to be absolutely serious with you for a moment.
You must, and I mean must, take some time to break in your new sneakers.
If you’ve never done this, I’m not judging. I was once like you. They aren’t heavy work boots or hard-heeled dress shoes, so why bother?
Perhaps you’ve lucked out and somehow managed to constantly find sneakers that don’t need this kind of prep. But, all well-built sneakers, even athletic ones, will send you to blister city if you don’t break them in first.
Prevent sore ankles, feet, and legs, with these easy hacks.
Table of Contents
What You’ll Need to Break in Your New Sneakers

Here’s what you’ll need, most of which you probably already have.
Each of these tools are related to different strategies, so you might not even need all of them depending on which ones you’re going to try.
- Thick socks, like the wool kind you wear in winter. Otherwise, just several gym socks will do
- A hair dryer
- A shoe stretcher
- A regular everyday spoon
- Bandages
- Moleskin cotton adhesives
- Resealable plastic sandwich bags
- Water
- A freezer
How to Break in Sneakers: 7 Hacks You Need to Know
1. Wear Your Sneakers in Short Bursts

We’ll start with the obvious one. Why short bursts, you ask? Why not treat it like a frat haze and just get the pain and humiliation over with so you can start enjoying the fruits of your labor?
Well, even if you have the pain tolerance of an MMA fighter, this actually isn’t good for most shoes.
The natural moisture from your feet needs time to evaporate, and your feet swell during the day especially if you’re walking a lot. This combination can lead to slight deformation, the shoes not accommodating your actual foot shape, or hygiene issues.
Remember, your shoes are getting to know you as much as you’re getting to know them—it’s like early-stage dating.
You can simply walk around your house in your new sneakers for 15 minutes at a time, perhaps before work or after work. Make sure to go up and down stairs when you can.
As they start to get more comfortable, you can up the time spans.
2. Wear Them with Thick (or Multiple) Socks
As I previously addressed the high-pain-tolerance gents, this break-in method is great for those who are a bit more sensitive in the foot area (nothing wrong with that, by the way).
Not only do thick wool socks, or several layers of socks, gently stretch the material of the shoes, but they create a protective padding around your feet.
You’d use the exact same method as previously mentioned. If walking around in unbroken-in sneakers for 15 minutes around the house was too painful for you in regular socks, this should do the trick.
3. The Low-Heat Hair-Dryer Method
I’m going to take this opportunity to tell you not to throw your shoes in the dryer, unless you want a slightly more mini version of them.
The hair dryer method works for strong leather or canvas shoes, but not for weak fake leathers and certain vegan leathers. Some vegan leathers are sturdy enough for this method, a lot of mushroom-based hybrid materials for example, but just be absolutely sure it can handle the heat.
Basically, you’ll just hold your blow-dryer about 10 inches away from the shoe and lightly blast the exterior and interior for about 30 seconds.

Then, you’ll walk around the house in the shoes for about 15 minutes. Figure out where the specific hotspots are.
From there, you’ll blow dry the specific areas where you felt tightness, again, about 10 inches away. This time, you’ll want to spend a lower amount of time on the specific places, about 20 seconds per, since the heat is more concentrated.
Sometimes, you won’t feel hotspots from your sneakers until a few sessions in. Feel free to still use this method in that situation.
4. The Sneaker Massage
This strategy works particularly well for athletic shoes.
Hold your shoes with both hands and find the flex points on the outsoles.
For most athletic sneakers, there’s usually indents on the outsole to show you where it’s meant to bend. For non-athletic sneakers, focus on the front of the shoe and avoid the arch (you want the natural shape of your feet to take care of that).
Just give these flex points a few bends before and after wearing your sneakers. It essentially does the same thing stretching before a workout does for your body.
5. Use Bandages and Moleskin Cotton
Using bandages and moleskin cotton is more of an insurance policy, though feel free to combine this with any of the other methods that require you to wear the sneakers.
Sometimes, you think your sneakers are broken in, then when you wear them out in the real world, you’re moving in ways you didn’t anticipate. Last-minute flag football, perhaps.
If you start to feel pain or discomfort, you can do one of two things.
You can bandage up the problem areas on your feet. So if there’s rubbing on your pinky toe, go ahead and wrap that guy up.
Or, you can stick moleskin cotton, which is designed to adhere to the interior of your shoes, to the parts of the shoe that are assaulting your feet.
Typically you wouldn’t be able to use both without causing unnecessary tightness. There’s only so much room in there.
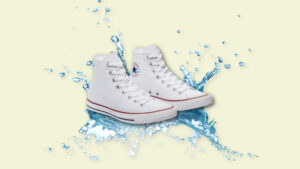
6. The Freeze Method
Just like the hair-dryer method, you’ll want to ensure your shoes can handle this. Tightly-woven canvas and full-grain leather? Yes. Plastic leather simulants and cheap rubber? Absolutely not.
My note with leather shoes though is to remember to condition it after the process.
Take two resealable plastic bags and fill them up with water. Make sure they’re small enough to fit inside your shoe, but large enough to expand when they freeze.
I like to double-bag the water for insurance, but that’s just me.
Make sure there’s as little air in the bags as possible, and stuff them into your shoes.
Place the shoes in your freezer for about five hours.
Finally, take the shoes out, wait for the water to thaw, and check to see if any hotspots have improved. Feel free to repeat this as necessary.
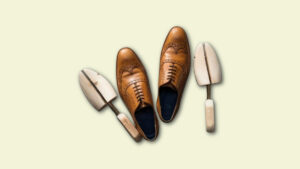
7. Shoe Stretcher and Spoon
Shoe stretchers are made for breaking shoes in, or for shoes that are just slightly too small. Maybe you’re a half size or one of your feet is a different size than the other.
Just place the shoe stretcher into the sneaker and keep it in there for about six hours. Stretchers have a mechanism that lets you move the toe portion and the heel portion further apart. Move these parts apart until you feel tightness.
This method is something you can potentially do overnight.
Then, take the stretcher out, and press a spoon into the interior sole of the shoe a few times, starting from the heel, then the middle, then the front. It’s supposed to simulate the motion of walking.
Do this a good four or five times per shoe.
Comfort, At Last
Overall, you’ll likely use a combination of these hacks depending on what the sneakers are doing to your feet. After all, no two pairs are the same.
The freezing method and shoe-stretcher strategy are meant to support the initial stretch of the shoes, while the blow-dryer and bandage approaches are meant to target specific areas.
You’ll never fully avoid simply wearing new sneakers during the break-in period, but you can definitely shorten this period or make it less painful.
FAQs
How long do sneakers take to break in?
It typically takes two to three weeks, though it depends on the shoes. Athletic shoes typically don’t take as long as sturdy leather sneakers.
How do you break in tight shoes fast?
You can use a shoe stretcher, or a good home method is freezing bags of water inside the shoes. You’ll do this in combination with wearing them in short bursts.
Do you have to break in new sneakers?
Yes, well-builts sneakers will need to be broken in. Even athletic trainers need to form to your feet before they’re perfectly effective.

Join the Discussion